Pulse Check Clash Review
Review clash results in Pulse Check: update and compact tests, change status, save viewpoints, and control dimming, highlighting, and zoom.
Navisworks Manage 2025–2027 · Updated
Open Pulse Check
Pulse Check is BIMPulse's clash review window. It works with the clash tests already in Navisworks Clash Detective. It doesn't create tests; to build them, use the Clash Test Generator or Clash Detective.
Open a saved Navisworks file
The Pulse Check button is available once you're signed in with an active license and the open file has been saved at least once. If it's greyed out, see First-Time Setup.
Click Pulse Check on the BIMPulse tab
The window opens and loads your clash tests. Only one Pulse Check window can be open at a time.
The Pulse Check window
Pulse Check opens in its own window that stays on top of Navisworks, so you can move it to a second monitor. It remembers its size and position for next time.
- The header shows Last Clash Test Update, the time Pulse Check last loaded your clash data, and a Settings button. Settings (or Ctrl+,) opens the Account & Options window on its Pulse Check page.
- The Clash Tests pane sits on top and the Results pane below it. Drag the divider between them to give either pane more room.
- Pulse Check closes itself when you open a different file, or use Save As to save to a new location. A normal save leaves it open.
Clash Tests pane
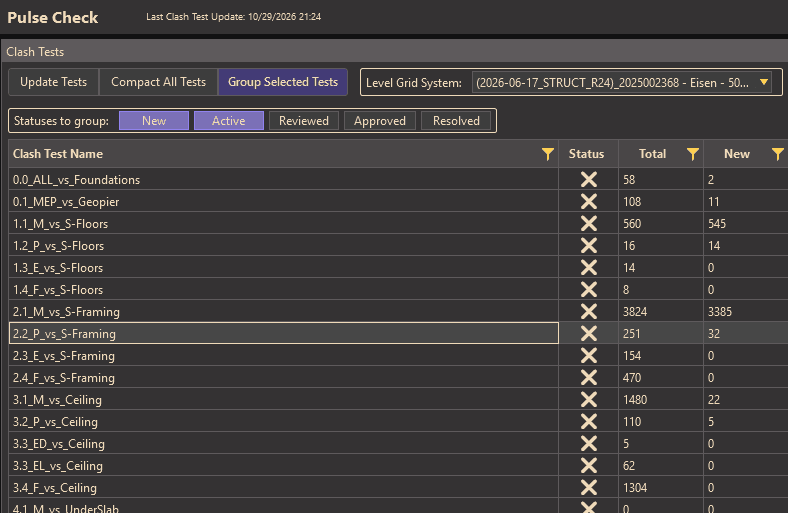
| Control | What it does |
|---|---|
| Update Tests | Runs every clash test in the file (not just the selected ones), then reloads the results. You can stop it with Abort. |
| Compact All Tests | Runs Navisworks’ compact on every test, which removes resolved clashes. |
| Group Selected Tests | Groups and renames the clashes in the selected tests. See Clash Grouping & Renaming. |
| Level Grid System | The grid system whose levels Pulse Check uses for the Level column, grouping, and clash sectioning. Pulse Check uses the one saved in the file, otherwise the active Navisworks grid system, otherwise the first one. |
| Statuses to group | Which clash statuses grouping includes. New and Active are on each time Pulse Check opens. |
The test list shows Clash Test Name, Status (✔ when Navisworks reports the test as complete, ✖ otherwise), and counts for Total, New, Active, Reviewed, Approved, and Resolved. A clash group counts once, under the group's own status.
Click a test to see its results. Hold Ctrl or Shift to select several; the Results pane then shows results from all of them.
Results pane
The toolbar above the results has:
- Group Selected, Explode Group(s), and Rename Selected: see Clash Grouping & Renaming.
- Select Model Items: selects both clashing items in Navisworks. For a group, it selects the items from every clash in the group.
Columns
- Display Name: the clash or group name. Click the arrow on a group row to show the clashes inside it.
- Count: the number of clashes in a group. A single clash shows 0.
- 📸: checked when the clash has a saved viewpoint.
- Status: the Navisworks clash status.
- Level: the level the clash sits on, from the Level Grid System. Shows UNKNOWN when it can't be worked out.
You can sort, reorder, and resize columns. Sorting keeps each group's clashes under it. Column changes reset when you close Pulse Check.
Filter results
To list only some results, click the filter icon in the Status, Level, or Count column header, tick the values you want, and click Filter. To list everything again, open the same filter and click Clear Filter.
Filters only change the list. Highlight All and Apply to All still cover every clash in the selected tests. Filters reset when you close Pulse Check.
Change clash status
Select one or more rows, right-click, and choose Approve Selected, Review Selected, Activate Selected, or Mark New. Choosing a group changes the status of every clash inside it. There is no Resolved option in this menu. Each status change also has a hotkey.
Saved viewpoints
Select one clash or group, set up the view you want, then right-click and choose Save Viewpoint. It replaces any viewpoint already on that clash without asking. To take a viewpoint off, choose Remove Viewpoint; saving a viewpoint can't be undone with Ctrl+Z.
When you select a clash that has a saved viewpoint and Zoom Clash is on, Pulse Check opens that viewpoint.
Display settings
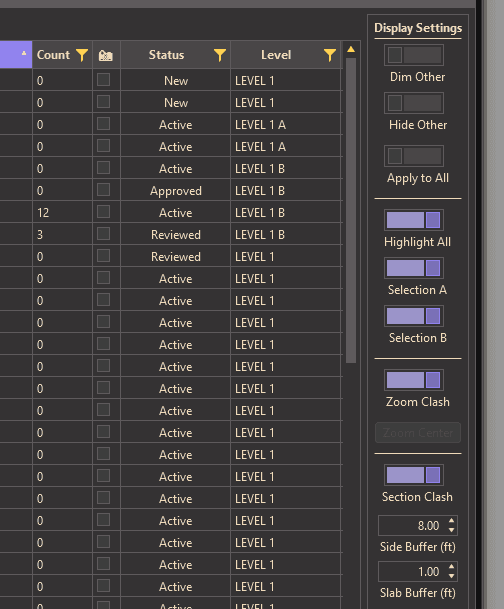
The Display Settings panel controls what you see in the 3D view as you click through results. Select a clash test first; the switches are unavailable until you do.
| Setting | What it does | Default |
|---|---|---|
| Dim Other | Turns everything except the clashing items dark grey and mostly transparent. | Off |
| Hide Other | Hides everything except the clashing items. Dim Other and Hide Other can’t both be on; turning one on turns the other off. | Off |
| Apply to All | With Dim Other or Hide Other on, keeps every clash in the selected tests visible. Turn it off to keep only the selected clashes visible. | On |
| Highlight All | Colors every clash in the selected tests. Turn it off to color only the selected clashes. | On |
| Selection A | Colors the Selection A item of each clash. | On |
| Selection B | Colors the Selection B item of each clash. | On |
| Zoom Clash | Zooms to each clash as you select it, using its saved viewpoint if it has one. | On |
| Zoom Center | A button that re-frames the view on the selected clash, ignoring any saved viewpoint. | — |
| Section Clash | Sections the view around each clash. See Clash Sectioning. | Off |
To change the highlight colors, open Settings, go to the Pulse Check page, pick new Selection A and Selection B colors under Clash highlight colors, and click Save. The new colors appear on your next selection.
Apply to All, Section Clash, and the side buffer are remembered between Navisworks sessions. The other switches go back to their defaults when you restart Navisworks.
Dim Other and Hide Other reset model overrides
Dim Other and Hide Other clear every hide and color override in the model, including ones you set yourself, and Pulse Check clears them again when it closes. Saving the file also clears them and turns Dim Other and Hide Other off. If you've set up an appearance you want to keep, save it as a viewpoint first.
With Apply to All on, selecting a clash loads the items for every clash in its test, so the first selection on a large test can take a moment while Loading Model Items... shows. Hide Other can also be slow on large models.
Where settings are saved
- In the Navisworks file: grouping and naming settings, the Level Grid System, and the slab buffer. Save the file as an NWF or NWD to keep them. Opening the file on another computer brings them along.
- For your Windows user: highlight colors, the window's size and position, Apply to All, Section Clash, and the side buffer, in
%APPDATA%\.BIMPulse\ BIMPulse\ PulseCheckSettings.json
If the file is read-only or open somewhere else, BIMPulse can't store settings in it. When you close Pulse Check you'll see BIMPulse – Settings Not Saved. Save the file as an NWF or NWD you can write to, then try again.
Good to know
- Update Tests runs every clash test in the file, whichever tests are selected.
- Last Clash Test Update is when Pulse Check last loaded your clash data, not when Navisworks last ran the tests.
- If the Results pane is empty after an update, select the test again.
- A file that has never been saved can't open Pulse Check. Save it first.
Related guides
Clash Grouping & Renaming
Group Navisworks clashes by level, grid, proximity, and more, auto-group after test updates, and rename clashes with a naming template.
Clash Sectioning
Section the Navisworks view around each clash, set side and slab buffers, and adjust the section box with on-screen handles.
Custom Hotkeys
Change Pulse Check keyboard shortcuts, see the defaults, fix conflicts, and learn where custom hotkeys work in Navisworks.
Clash Test Generator
Build every Navisworks clash test from one matrix, update existing tests without losing results, and import tests from a Clash Detective XML.
Still stuck, or spotted something out of date? Contact support and tell us which guide you were using.