Clash Grouping & Renaming
Group Navisworks clashes by level, grid, proximity, and more, auto-group after test updates, and rename clashes with a naming template.
Navisworks Manage 2025–2027 · Updated
How grouping works
Pulse Check groups the clashes inside each clash test and writes the groups back to Navisworks Clash Detective, so they're there for anyone who opens the file.
- You pick a primary grouping mode and, optionally, a secondary grouping mode. Two clashes end up in the same group only when they match on both. For example, Level then Proximity groups clashes that are on the same level and close to each other.
- A clash that doesn't fit any group stays ungrouped. It still gets renamed with your naming template.
- Each new group is named with your naming template. The clashes inside it are renamed Clash 1 – item A -x- item B, Clash 2 – …, and so on.
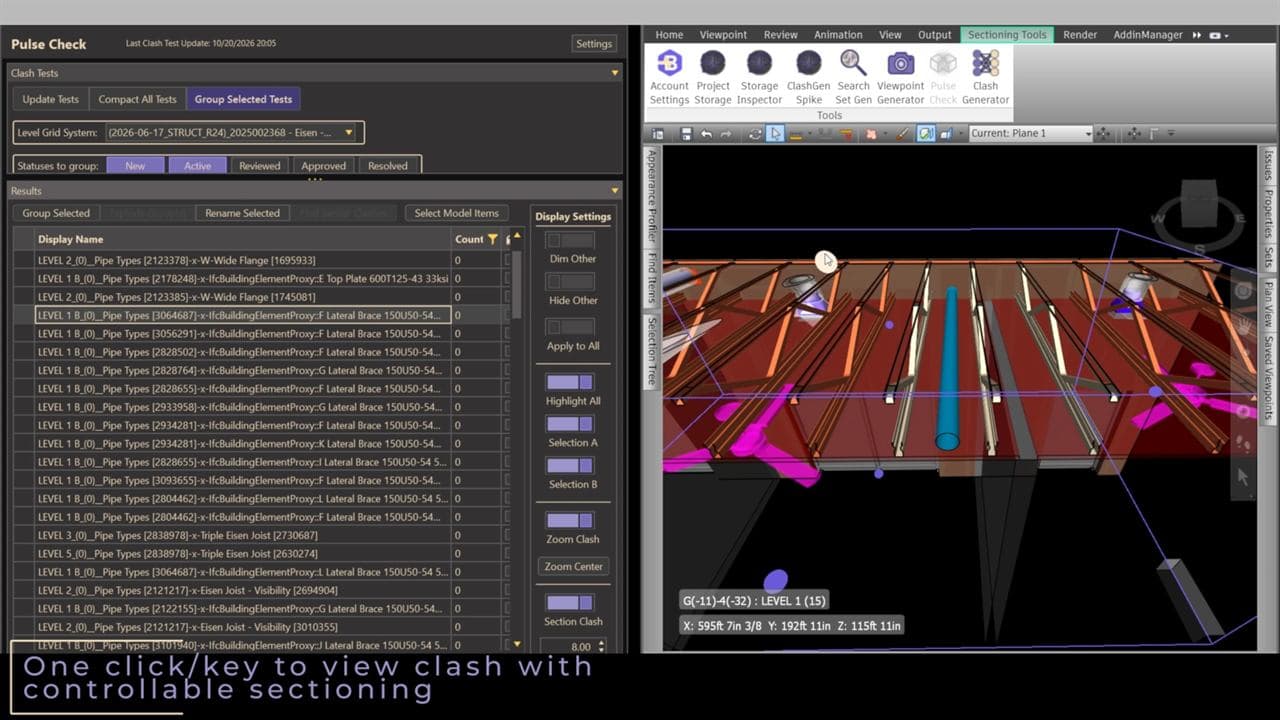
Grouping modes
The mode lists show these names:
| Mode | Groups clashes by |
|---|---|
| Level | The level each clash sits on, from the Level Grid System. If the grid system has no levels, every clash goes into one group. |
| GridIntersection | The nearest grid intersection in the Level Grid System. Choose a grid system first. |
| SelectionA | The item on the Selection A side of the clash. |
| SelectionB | The item on the Selection B side of the clash. |
| ModelA | The model file the Selection A item comes from. |
| ModelB | The model file the Selection B item comes from. |
| AssignedTo | Who the clash is assigned to in Clash Detective. |
| ApprovedBy | Who approved the clash. |
| Status | The clash status. |
| Proximity | Distance: clashes within the grouping threshold of each other are grouped together. |
| SharedObject | Shared items: clashes that involve the same item are grouped together. |
| ProximityAndSharedObject | Distance, where sharing an item also counts as being close. |
The secondary list also has None, for grouping by the primary mode alone.
Large tests
SelectionA, SelectionB, ModelA, ModelB, SharedObject, and ProximityAndSharedObject load the model items for every clash before grouping, so they take longer on large tests.
Set up grouping
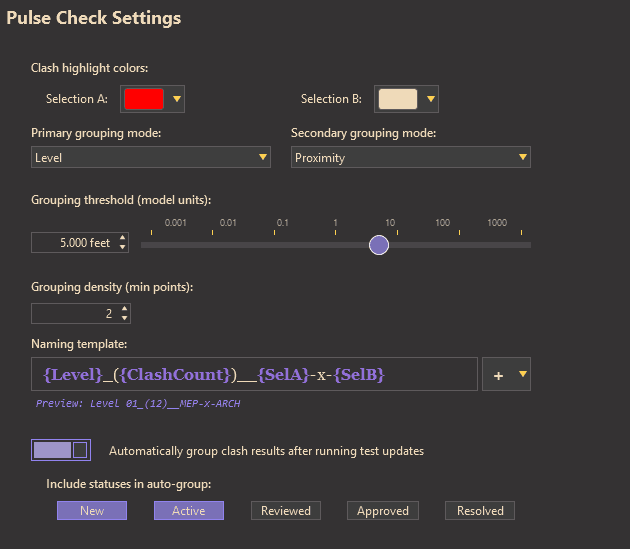
Open the Pulse Check settings
In Pulse Check, click Settings (or press Ctrl+,). The Account & Options window opens on its Pulse Check page.
Choose your grouping modes
Pick a Primary grouping mode and a Secondary grouping mode. New files start with Level and Proximity.
Set the distance for proximity modes
When either mode uses proximity, Grouping threshold appears. Enter the distance in feet, from 0.001 to 1000, or drag the slider. It's always in feet, even on a metric model. The default is 1 foot.
Click Save
Grouping settings are stored in the Navisworks file, so save the file afterwards to keep them.
Group clash tests
Check the Level Grid System
In the Clash Tests pane, make sure Level Grid System is the grid system you coordinate to. Level and GridIntersection grouping use it.
Choose which statuses to group
Use the Statuses to group toggles to pick which clashes get grouped. New and Active are on each time Pulse Check opens.
Select the tests
Click a test, or hold Ctrl or Shift to select several.
Click Group Selected Tests
A progress window shows each test as it's grouped. You can stop with Abort.
Read the summary
When it finishes you'll see Bulk grouping completed., how many tests succeeded, how many groups were created and clashes regrouped, and how long it took. If a test fails, the summary lists it with the reason.
Running it again: clashes with the selected statuses are taken out of their old groups and grouped again, and any group left empty is deleted. Clashes with other statuses stay where they are. For example, leave Approved off to keep groups of approved clashes as they are.
Group automatically after updates
On the Pulse Check settings page, turn on Automatically group clash results after running test updates and click Save. From then on, Update Tests groups every clash test once the update finishes, using your grouping settings and the Statuses to group toggles. It's off by default.
Group and ungroup by hand
- Group Selected: in the Results pane, select two or more ungrouped clashes from the same test and click Group Selected. They move into one new group.
- Explode Group(s): select one or more groups (only groups) and click Explode Group(s). The clashes move back into the test and the group is deleted.
Naming template
The naming template sets the name of each group and ungrouped clash. Edit it under Naming template on the Pulse Check settings page. Type { to pick a token from a list, or use the + button. Tokens Pulse Check recognises turn bold, and the line underneath shows a preview with sample values.
| Token | Becomes |
|---|---|
{Level} | The level name, or UNKNOWN when it can’t be worked out. |
{SelA} | The name of the Selection A item. For a group, it comes from one of its clashes. |
{SelB} | The name of the Selection B item. For a group, it comes from one of its clashes. |
{ClashCount} | The number of clashes in the group, or 0 for a single clash. |
Anything outside the braces is kept as you typed it. The default template is {Level}_({ClashCount})__{SelA}-x-{SelB}, which previews as Level 01_(12)__MEP-x-ARCH.
Click Save when you're done. The template is stored in the Navisworks file.
Rename clashes
Grouping renames clashes automatically. To rename without regrouping, select groups or clashes from one test in the Results pane and click Rename Selected. Each selected row is renamed with the template. The clashes inside a selected group keep their names.
Related guides
Pulse Check Clash Review
Review clash results in Pulse Check: update and compact tests, change status, save viewpoints, and control dimming, highlighting, and zoom.
Clash Sectioning
Section the Navisworks view around each clash, set side and slab buffers, and adjust the section box with on-screen handles.
Custom Hotkeys
Change Pulse Check keyboard shortcuts, see the defaults, fix conflicts, and learn where custom hotkeys work in Navisworks.
Clash Test Generator
Build every Navisworks clash test from one matrix, update existing tests without losing results, and import tests from a Clash Detective XML.
Still stuck, or spotted something out of date? Contact support and tell us which guide you were using.